How To Remove A Virus From An iPhone Or iPad

Published:

Your iPhone and iPad likely play an important role in your daily life. But sometimes, just like computers, they can get viruses. iPhone malware can cause problems and put your personal information at risk. That’s why knowing how to get rid of them quickly and easily is important to safeguard your privacy.
Certo is here to help. In this guide, we’ll show you the fastest way to remove viruses from your iPhone or iPad.
We’ll also explain how these viruses work and how you can avoid them in the future. Whether you’re dealing with a current virus problem or want to keep your devices safe in the future, you’ll find the answers here.
Ten Steps to Remove iPhone Viruses
1. Restart your iPhone
Restarting your iPhone or iPad can often resolve minor software glitches and is usually a good first step to take if you’re experiencing issues. A simple restart can also permanently disable certain types of viruses and spyware. Here’s how to do it:
- Press and hold the side and volume buttons until the power off slider appears.
- Swipe the slider that says slide to power off.
- After turning off your device, wait 30 seconds to a minute before turning it back on. This allows the device to shut down fully.
- Switch your device back on by pressing and holding the side button until the Apple logo appears.
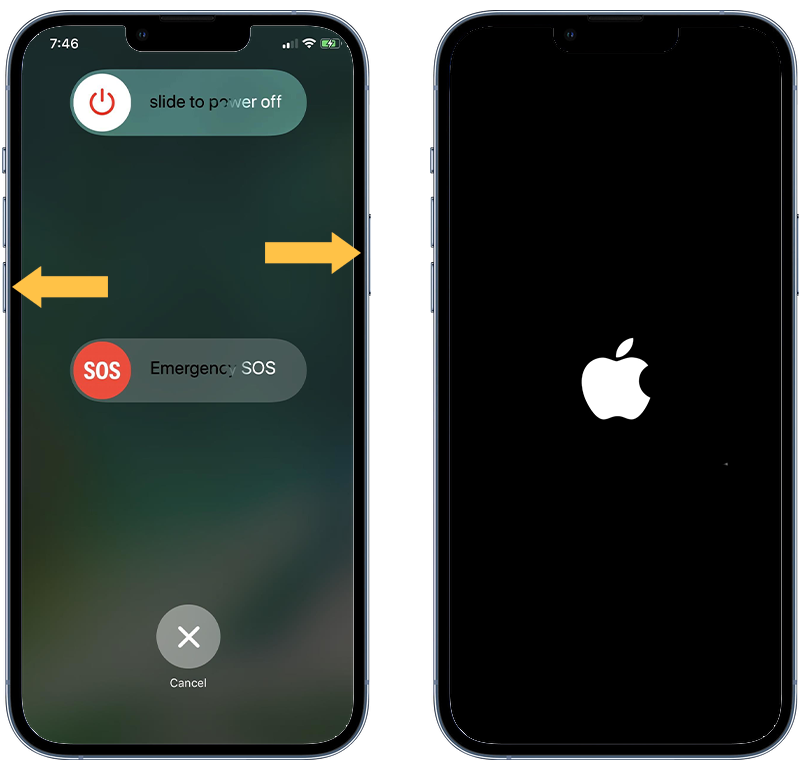
Fig 1. Restarting an iPhone.
2. Update iOS
Keeping your iOS version up-to-date is crucial for security and performance. Apple regularly releases updates to fix bugs and security vulnerabilities. These updates can help protect your device against the latest viruses and remove active threats from your device. Here’s how to update your iOS:
Before you start
Ensure your device is connected to a Wi-Fi network. Updates can be large and may use a lot of data.
It’s also a good idea to backup your device before updating it. You can do this through iCloud or by connecting your device to a computer and using iTunes (or Finder, if you’re on Mac).
How to check for and install the latest iOS version
- In the Settings menu, tap General.
- Here, you’ll find the Software Update option. Tap on it to check for available updates.
- If an update is available, you’ll see an option to Download and Install. Tap it. If your device asks for a passcode, enter it.
- Once the update is installed, your device will restart. You might see a progress bar or the Apple logo during this process.
- After your device restarts, you may see a screen asking you to continue the update. Follow any on-screen instructions to complete the process.
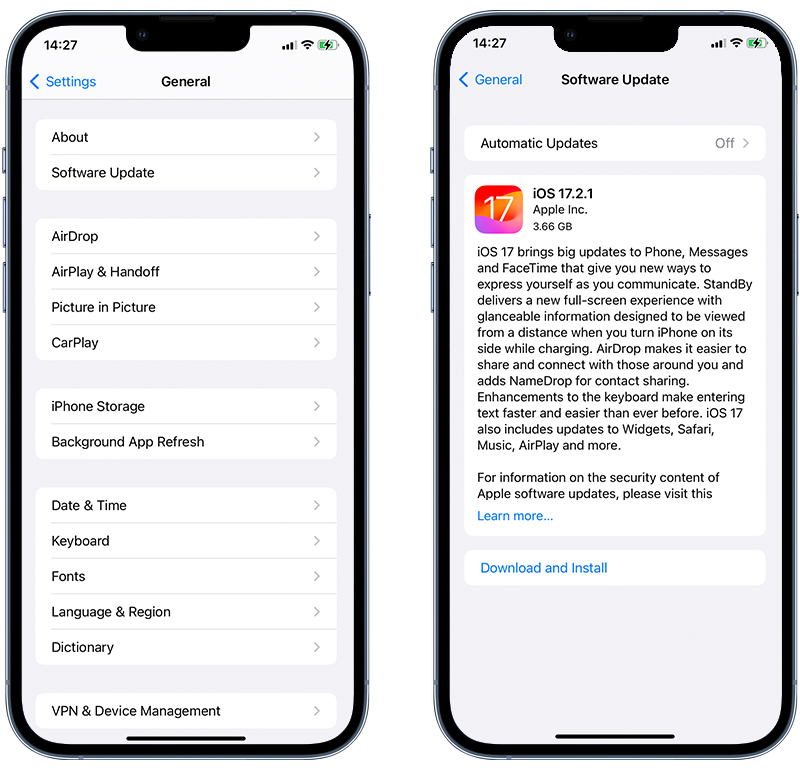
Fig 2. Updating iOS on an iPhone.
💡 Pro Tip: Set Up Automatic iOS Updates
You can enable automatic app updates in the same Software Update menu by turning on Automatic Updates. This will download and install updates overnight when connected to Wi-Fi and power.
3. Remove suspicious apps
If you notice problems with your device after downloading a specific app or see an unfamiliar app on your phone, it could be the source of the issue. Deleting suspicious apps is a straightforward process. Here’s how to do it:
- Go to your home screen and find the malicious apps you suspect are causing problems.
- Touch and hold the app icon until a menu appears.
- You’ll see an option to Remove App. Tap it.
- A confirmation message will pop up, asking if you’re sure you want to delete the app. Confirm by tapping Delete App. This action will uninstall the app from your device.
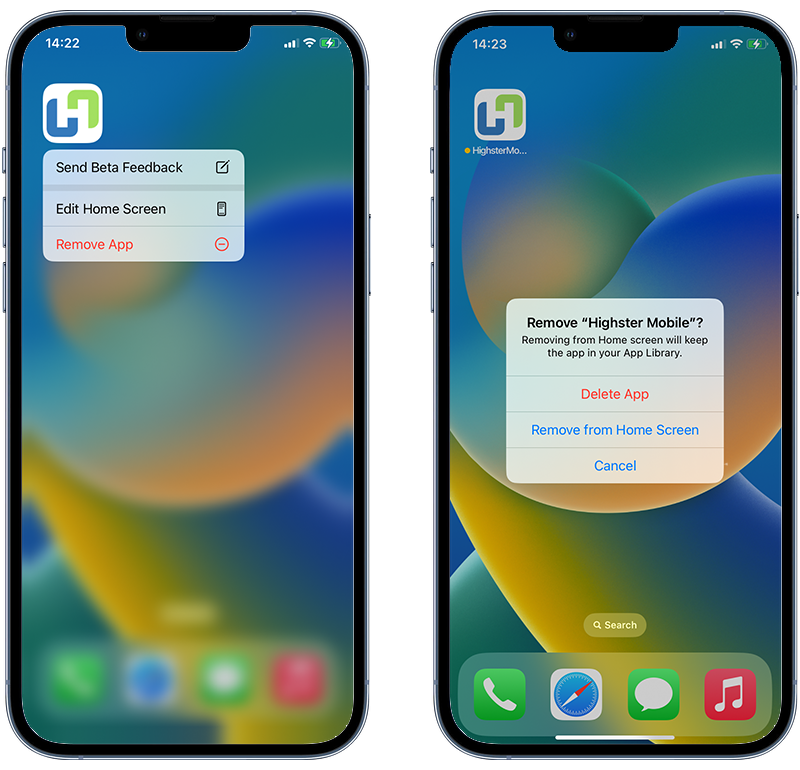
Fig 3. Removing an unknown app from iPhone.
4. Clear iPhone browsing data
Clearing your website data and browser history can effectively remove viruses, especially those contracted from online sources.
Here’s how to do it in Safari, the default browser on iPhones and iPads:
- Start by tapping the Settings app on your home screen.
- In the Settings menu, scroll down until you find Safari. Tap on it to open the Safari settings.
- In the Safari settings, scroll down until you find Clear History and Website Data. This option will remove your browsing history, cookies, and other browsing data.
- A prompt will appear, asking if you want to clear your history and data. Confirm by tapping Clear History.
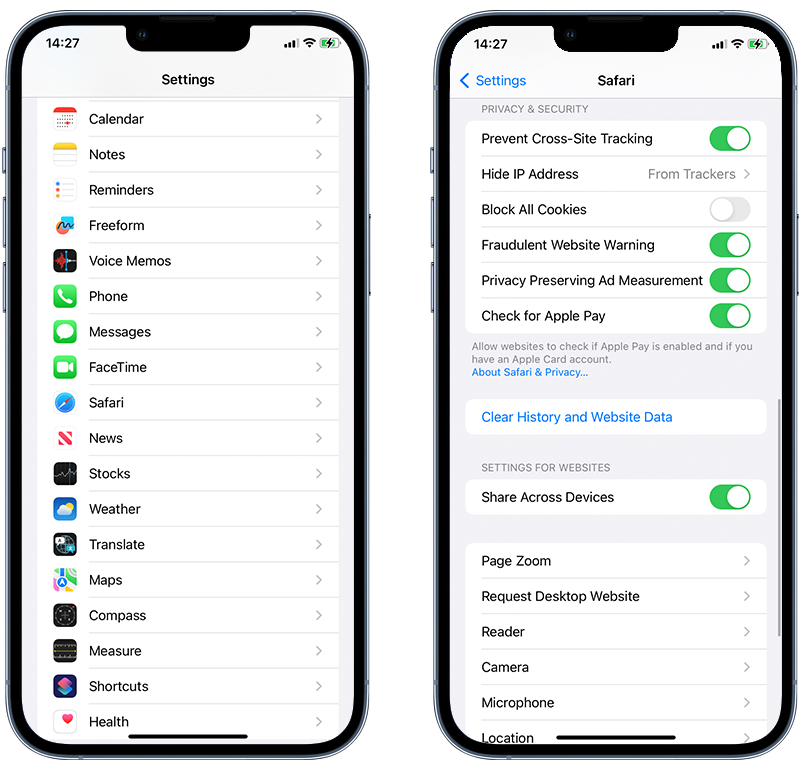
Fig 4. Clearing Safari history and data.
💡 Pro Tip: Be Aware of What You’re Deleting
Clearing history and data might log you out of websites or remove saved login information and website preferences, so consider this before clearing.
5. Revoke unrecognized configuration or enterprise profiles
Some organizations use configuration profiles to set up devices with specific settings or install bespoke apps.
However, hackers have also been known to use configuration profiles as a way to infect an iPhone with malware. If you find profiles that you don’t recognize, it’s a good idea to remove them.
To uninstall a configuration profile on an iOS device, follow these steps:
- Tap the Settings app on your home screen. Scroll down and tap on General.
- In the General settings, scroll down to find VPN & Device Management.
- If you have profiles installed, look through the list and identify any profiles you don’t recognize. Please note that if you use your device for work or school you may have a profile for that. Not all profiles are bad.
- To remove a profile, tap on it to see its details, and then tap Remove Profile. You may need to enter your device passcode to authorize this action.
- You’ll see a confirmation message after you tap Remove Profile. Tap Remove again to confirm that you want to delete the profile.
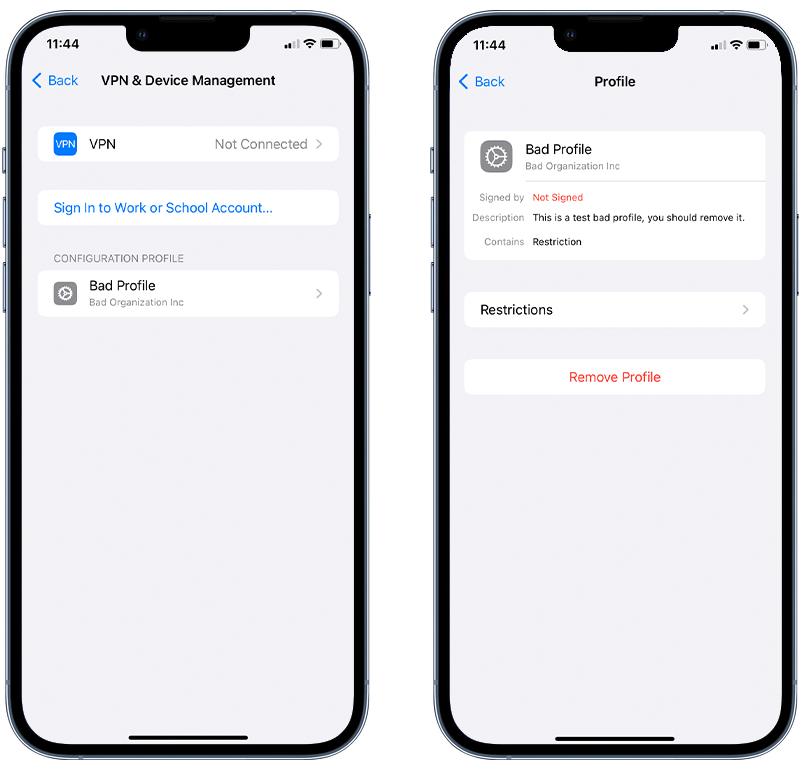
Fig 5. Uninstalling a configuration profile on iPhone.
6. Remove unrecognized custom keyboards
Malicious custom keyboards installed on your iPhone can act as keyloggers that record every keystroke you make, including passwords and personal information.
If a third-party keyboard is installed on your iPhone and you do not recognize it, it’s a good idea to remove it. Here’s how to do it:
- Tap the Settings app on your iPhone or iPad. Scroll down in Settings and tap General.
- In General, tap Keyboard.
- Tap Keyboards at the top. You’ll see a list of all keyboards installed, like your language and Emoji.
- Look for any keyboards you don’t recognize.
- Tap Edit in the top right of the Keyboards page.
- Tap the red minus (⊖) button next to the keyboard, then tap Delete.
- After removing keyboards, tap Done in the top right.
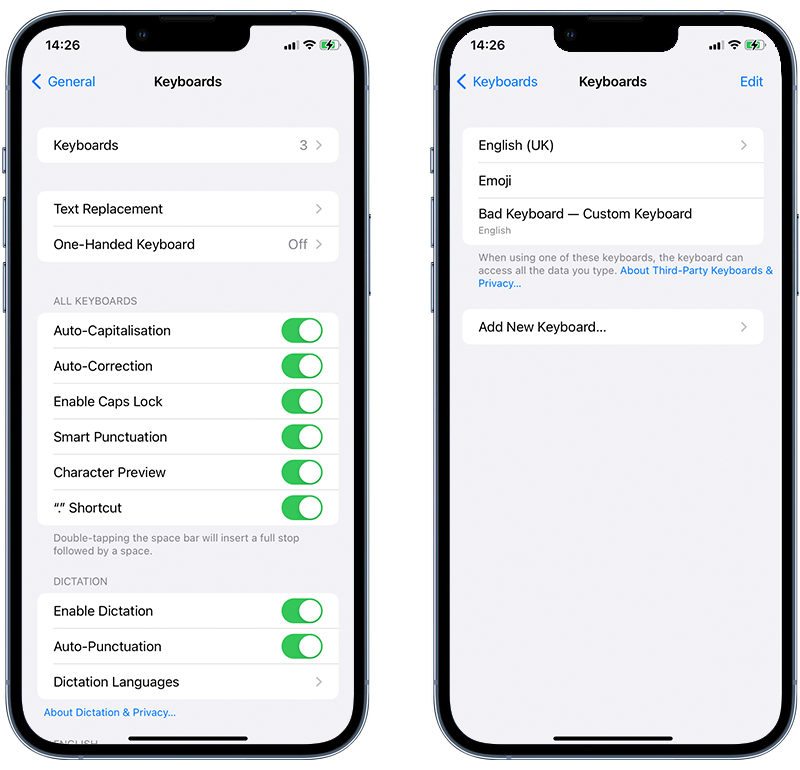
Fig 6. Removing a malicious keyboard on iPhone.
7. Enable Lockdown Mode
Lockdown Mode is an optional, extreme security feature available on iPhones and iPads running iOS 16 or later.
This feature is designed to provide additional protection against sophisticated cyberattacks, particularly from highly advanced spyware like Pegasus and Predator.
Lockdown mode is designed for people who might be personally targeted by surveillance software via state-sponsored cyberattacks due to their professions or identities.
To enable Lockdown Mode on an iPhone or iPad, follow these steps:
- Open the Settings app.
- Tap Privacy & Security.
- Scroll down and tap Lockdown Mode, then tap Turn On Lockdown Mode.
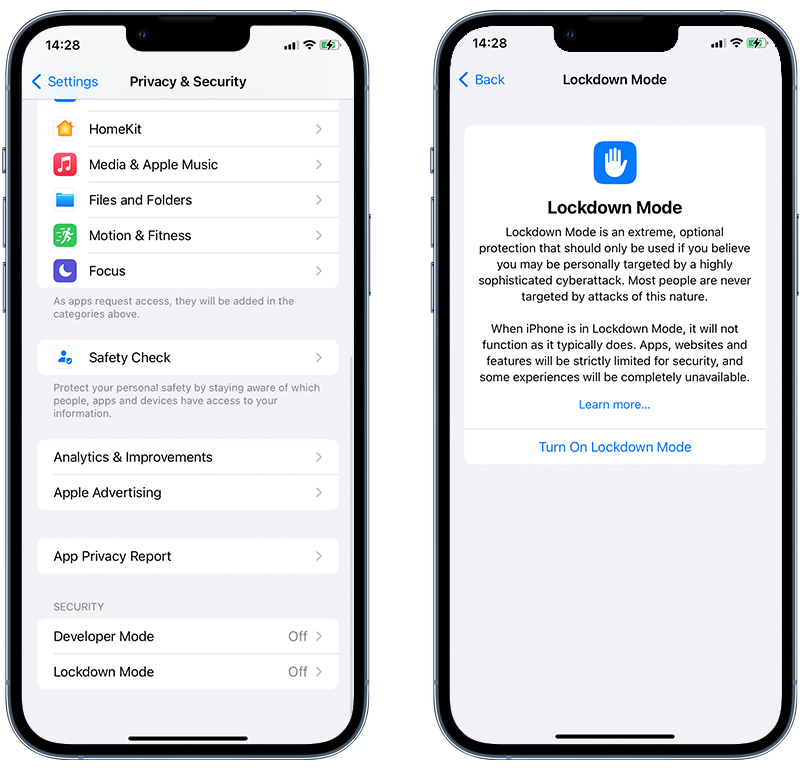
Fig 7. Enabling Lockdown Mode on iPhone.
⚠️ Important: When Lockdown mode is enabled, some aspects of your device will function differently. Certain apps, websites and features will be strictly limited and some experiences will be completely unavailable.
8. Turn off Developer Mode
Developer Mode on iOS devices is used mainly by developers to test apps and features. However, it can also expose your device to additional security risks. If you have never used your device for development but this feature is turned on then this could be a sign that your device has been tampered with. Here’s how to turn it off:
- Tap the Settings app on your home screen.
- Scroll down in the Settings menu and find Privacy & Security. Tap on it.
- In the Privacy & Security settings, look for an option that says Developer Mode.
- If Developer Mode is on, tap it and toggle the switch to turn it off.
- You might be asked to confirm your choice or enter your passcode. Follow the on-screen instructions to complete the process.
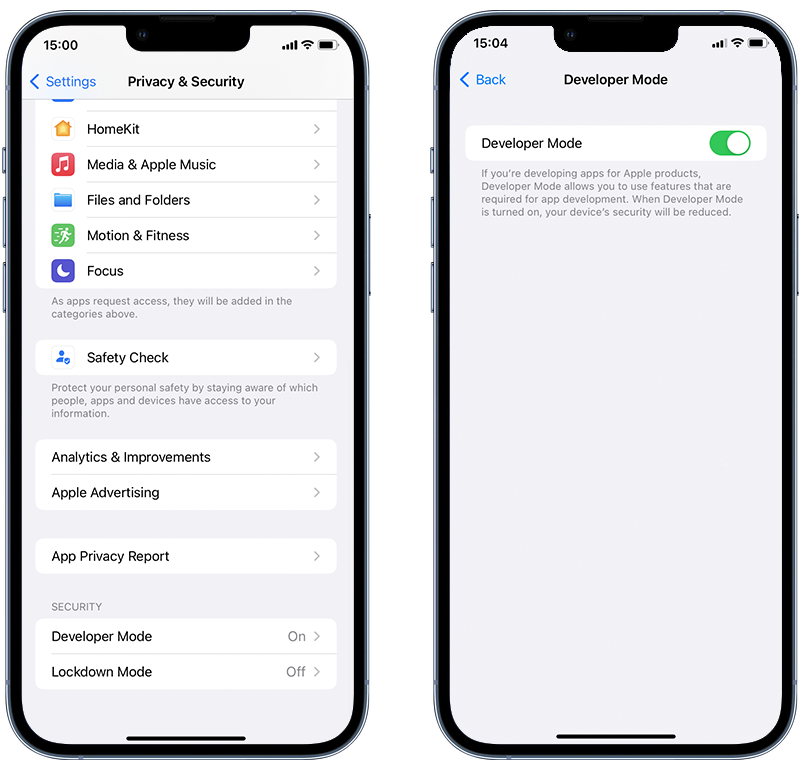
Fig 8. Disabling Developer Mode on iPhone.
⚠️ Important: The availability and location of Developer Mode settings can vary depending on your iOS version and whether you've used developer features before. If you can't find Developer Mode in your Privacy & Security settings, it’s likely never been used on your device.
9. Restore from a previous iCloud backup
If your device is still experiencing issues after trying other solutions, restoring it from a previous backup version can be a good option. This process will erase your current data, including any viruses, and replace it with the data from the backup. Here’s how to do it:
Before you start
Check that you have a backup from before you started experiencing problems.
You can view your backups in iCloud under Settings > [Your Name] > iCloud > Manage Storage > Backups. You can also view backups in iTunes or Finder if you’ve backed up to a computer in the past.
Restoring from a previous backup
Go to Settings > General > Transfer or Reset iPhone > Erase All Content and Settings. This will return your device to its factory settings.
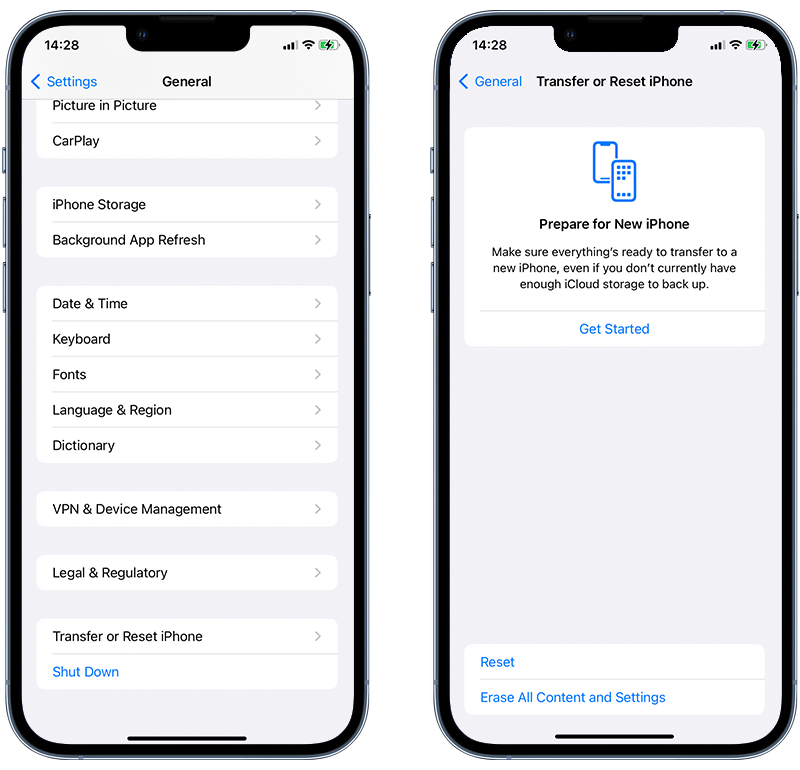
Fig 9. Returning an iPhone to factory settings.
After your device restarts, follow the on-screen instructions to set it up.
When you reach the Apps & Data screen, select Restore from iCloud Backup. Sign in to iCloud with your Apple ID and choose the backup you want to restore from.
10. Factory reset your iPhone
A factory reset is the final step you can take if your device is still having problems after trying other solutions. It’s the most effective method to remove 100% of viruses from an iPhone.
This process will erase everything on your device and restore it to its original factory settings, just like when it was new.
Here’s how to do a factory reset:
- Before you start, back up all your important data. You can use iCloud, iTunes, or Finder to create a backup.
- Tap the Settings app on your home screen.
- In the Settings menu, tap General.
- Scroll down to the bottom of the General settings and find Transfer or Reset iPhone. Tap on it.
- You may see several reset options. Tap Erase All Content and Settings. This is the option that completely wipes your device.
- Enter your device’s passcode or Apple ID password, if prompted. Then, confirm that you want to erase everything.
- Your device will start the reset process. It might take a while, so ensure your device has enough battery or is plugged into a charger.
- After the reset, your device will be like new. You can set it up as a new device or restore it from a backup.
⚠️ Important: A factory reset is irreversible. Once you've erased your data, you can't get it back unless you have a backup.
Spotting the Signs of iPhone viruses
Now that you know how to remove a virus, it’s equally important to recognize when your iPhone or iPad might be infected.
For iPhone users, being able to identify the symptoms of a virus and understanding where these threats typically come from can help you act quickly and keep your device safe.
Symptoms of a virus infection
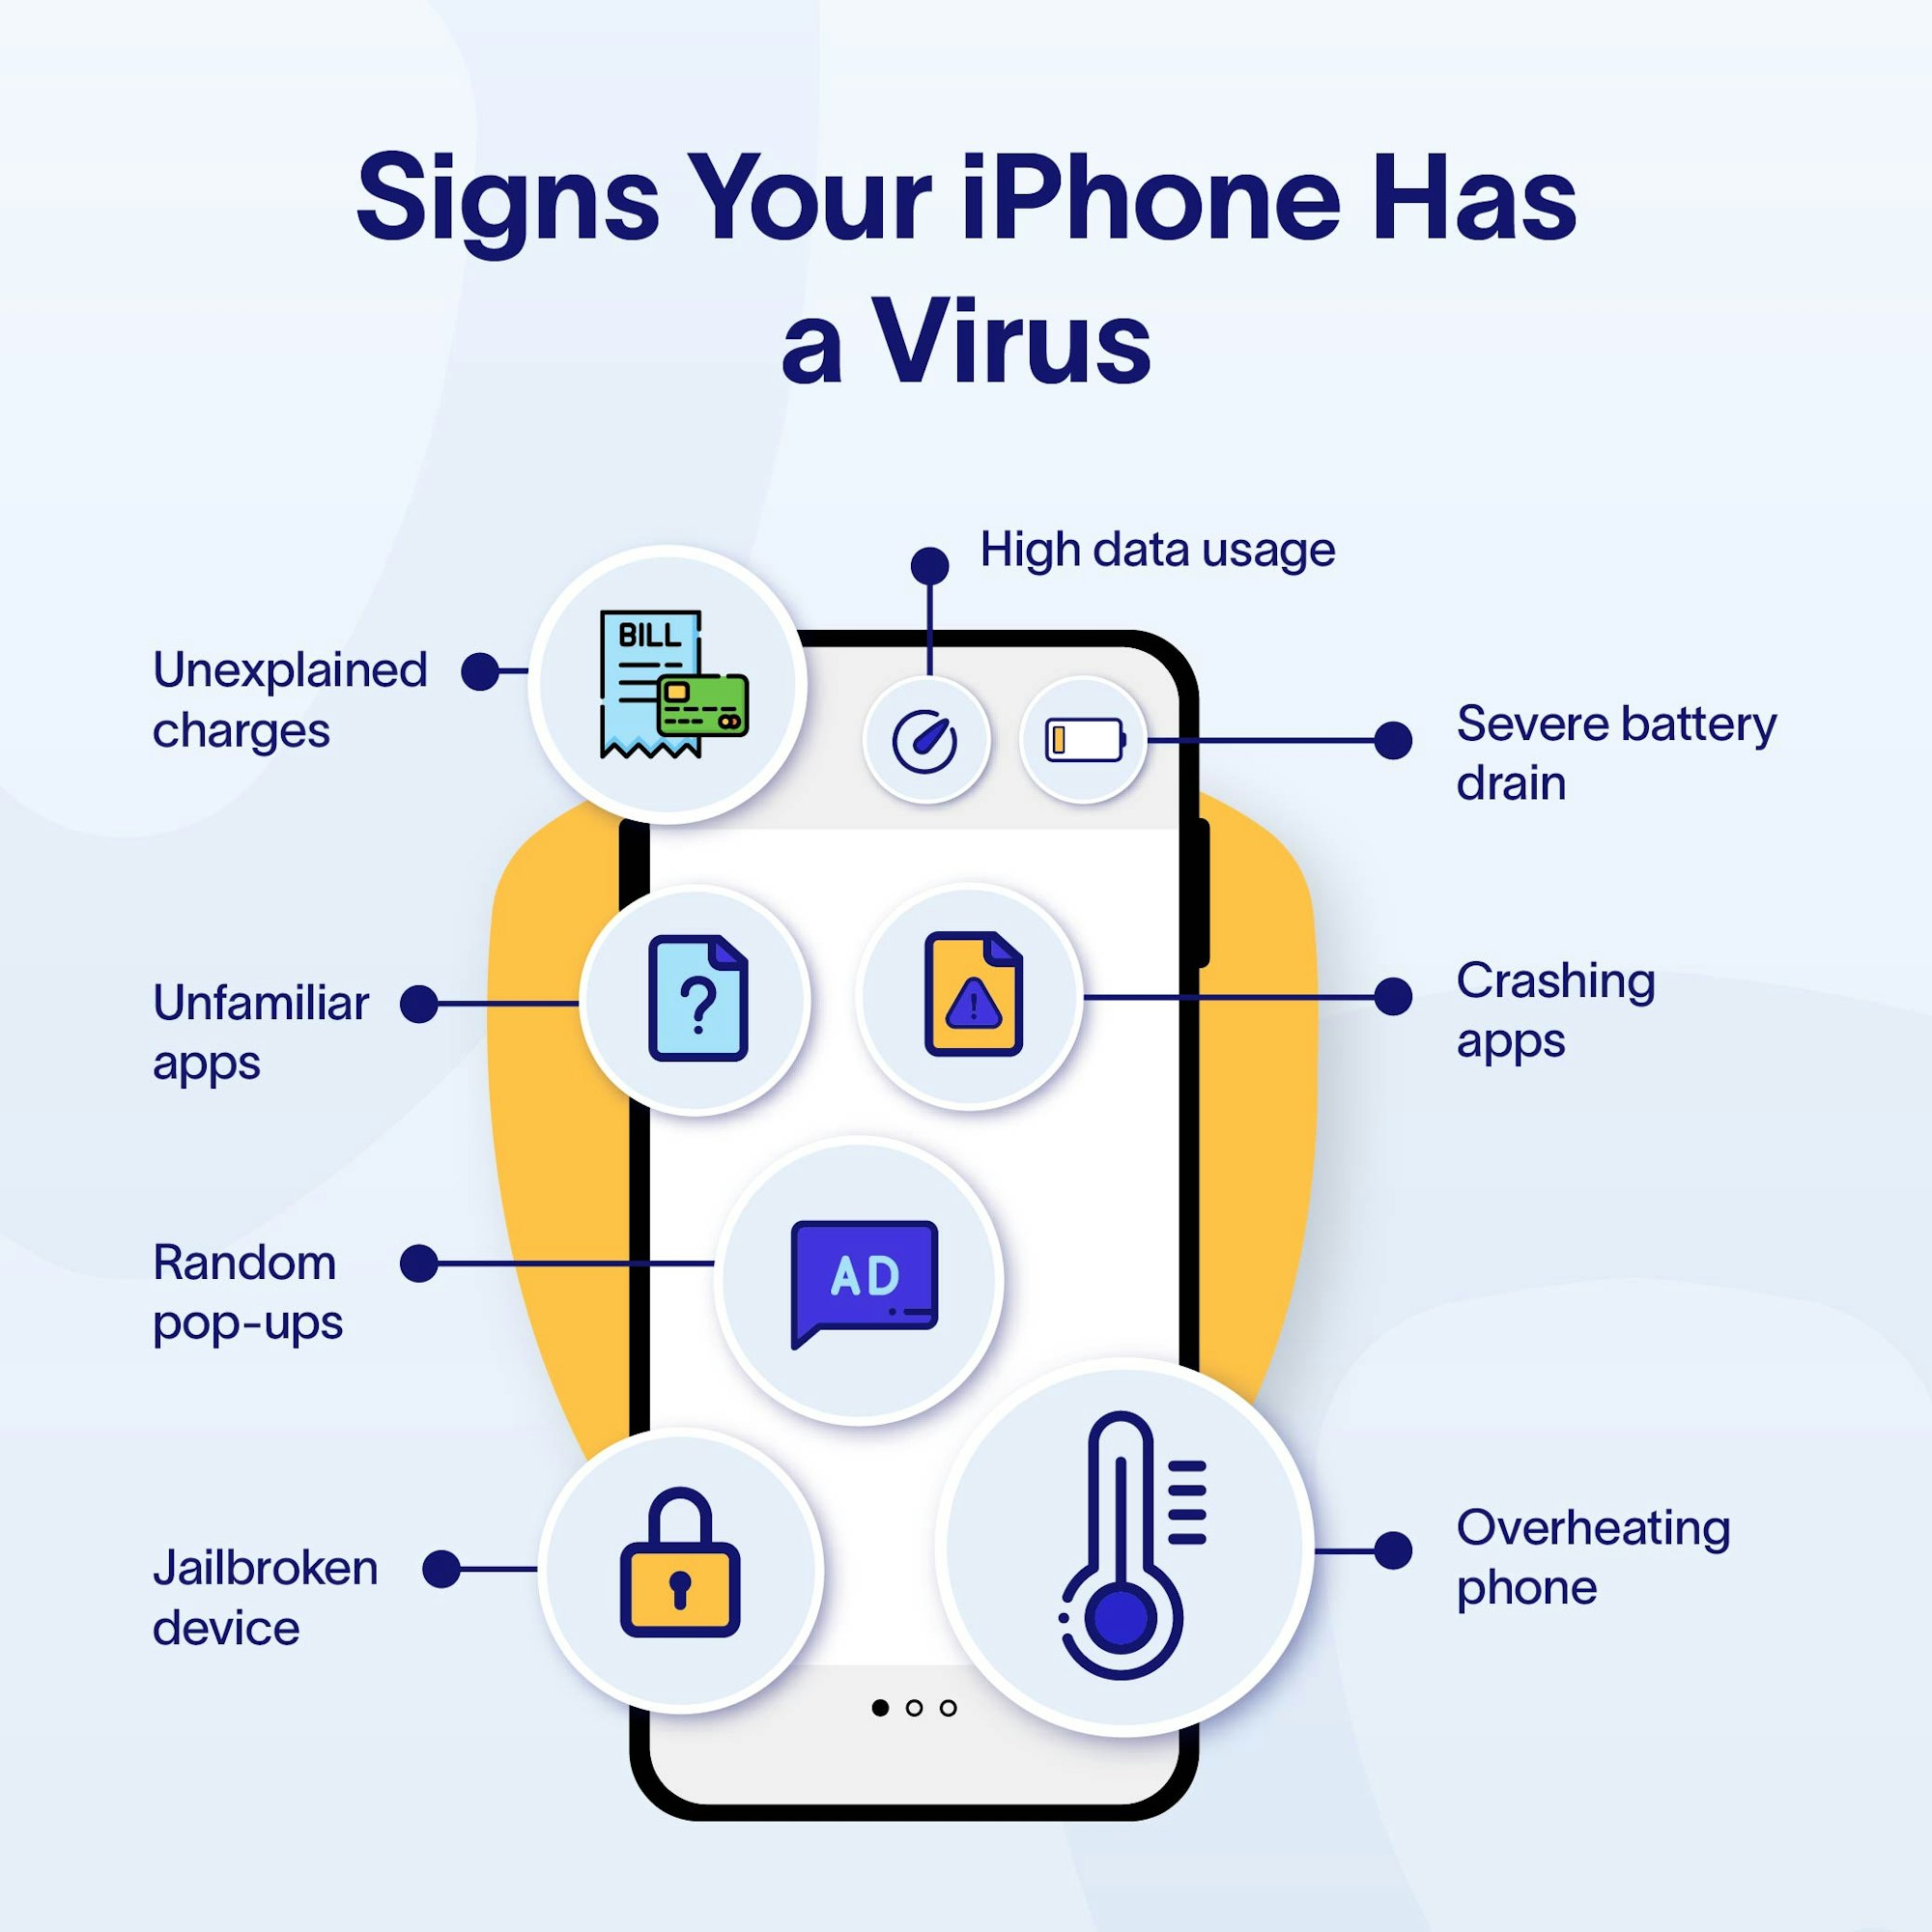
🚨 Unexpected pop-up ads
Seeing pop-ups or ads appear out of nowhere, especially when you’re not browsing the web, can be a sign of adware infection.
🔋 Unusual battery drain
If your device’s battery is draining faster than normal without any change in usage, it could indicate a virus running background processes.
📈 Increased data usage
A sudden spike in data usage that you can’t account for might suggest malware is transmitting data from your device.
💥 App crashes or unusual behavior
Apps crashing frequently or behaving oddly, like opening and closing on their own, can be symptoms of a virus.
🔥 Overheating
While it’s normal for devices to get slightly warm during use, excessive overheating without a clear reason could be caused by malicious software.
💸 Unexplained charges
Check your bill for services or apps you don’t remember purchasing, as some malware can make unauthorized transactions.
Common sources of phone viruses and other malware infections
❌ Malicious apps: Downloading an iPhone app from outside the official App Store increases the risk of installing a virus. Even within the App Store, be wary of apps with poor reviews or those from unknown developers.
❌ Cyberstalkers: Someone gets hold of your iPhone and installs a hidden spyware app, which allows them to monitor your communications and extract data from your device.
❌ Phishing attempts: Clicking on links in emails, messages, or malicious websites can sometimes lead to viruses. These links often appear as urgent requests or offers that seem too good to be true.
❌ Unsecured Wi-Fi networks: Using public or unsecured Wi-Fi networks can expose your device to risks, as hackers might intercept data or distribute malware.
❌ Jailbreaking: Jailbreaking iPhones removes many of their built-in security features, making them more vulnerable to viruses and malware infection.
Knowing these symptoms and sources can help you stay vigilant and identify a virus infection early. If you notice any of these signs, take steps to scan and remove potential threats from your device.
How to Protect Your iPhone or iPad from Malware
In the digital world, strong internet security measures are your first line of defense against common online security threats, such as malicious websites and apps.
Keeping your iPhone or iPad safe from viruses, malware, and other cyberattacks requires a combination of proactive strategies and a good understanding of the risks involved.
This guide will show you simple—but important—ways to keep your iPhone or iPad safe from common threats.
Regular iOS updates for security
Stay updated
Regularly updating your iOS device ensures you have the latest security patches. Apple frequently releases updates to fix vulnerabilities that viruses could exploit.
Automatic updates
Enable automatic updates in Settings under General > Software Update so your device stays up-to-date with minimal effort.
Best practices for app downloads and web browsing
✅ Download apps wisely: Only download apps from the official App Store. Apple’s review process helps screen apps for security threats, reducing the risk of downloading malicious software.
✅ Read reviews and check ratings: Before downloading an app, check user reviews and ratings. They can provide insights into the app’s performance and trustworthiness.
✅ Beware of phishing scams: Be cautious with links in emails, text messages, and websites. Avoid clicking on links or downloading attachments from unknown or suspicious sources.
✅ Use secure connections: Avoid using unsecured public Wi-Fi for sensitive transactions. Consider using a Virtual Private Network (VPN) for added security. We recommend NordVPN.
Enable Apple’s security features
✅ Face ID and Touch ID: Use Face ID or Touch ID for a secure and convenient way to unlock your device and authenticate transactions.
✅ Strong passcodes: Set a strong passcode that’s hard to guess. Avoid simple sequences or easily-guessable numbers.
✅ Find my iPhone: Enable Find My iPhone in iCloud settings. It can help you locate your device if it’s lost or stolen and allows you to erase data remotely, if necessary.
✅ Two-factor authentication: Turn on two-factor authentication for your Apple ID for an added layer of security. This helps to protect your account from remote attacks.
By following these preventative measures, you can significantly reduce the risk of virus infections and keep your iPhone safe.
💡 Pro Tip: Use an iOS Security App
Consider using one of Certo’s specialized apps for iPhone to enhance your device's security further. Certo’s apps will help you detect, remove and protect against various types of viruses, spyware and other security threats on your iPhone or iPad.
Key Takeaways
Keeping your iPhone or iPad safe from viruses and other online threats is crucial in our increasingly digital world.
By staying informed about potential risks and following the preventative measures outlined in this guide, you can significantly reduce the likelihood of encountering a virus on your iOS device.
Remember, regular updates, cautious app downloads, smart web browsing, utilizing Apple’s built-in security features, and using an iPhone security app are key to maintaining digital safety.
By being vigilant and proactive in protecting your personal information, you can continue to enjoy the vast benefits of your iOS devices with peace of mind. Stay safe out there!
Cover Image by Freepik